
Tags
Cisco has released Prime Infrastructure 2.2 today, a version long awaited by many of us. ISE 1.3, IOS-XE3.7, AeroOS-8.0 is supported in this PI2.2 version. Here is the release notes of this version & you need to go through it for greater details.
So what is the upgrade procedure for PI 2.2 ? You would think you can upgrade existing version to this like any other upgrade. You are wrong in this case 😯 . Here is what PI2.2 Quick Start Guide says about it.
“This version of Prime Infrastructure does not offer an in-place upgrade. To upgrade to the latest version, you must instead install this version of Prime Infrastructure as a virtual appliance on a fresh server, or order it pre-installed on a fresh hardware appliance. You can then migrate your data from your old Prime Infrastructure installation to the new one, using an application backup from the previous installation.
If you are currently using one of the following versions of Prime Infrastructure, you can back up your existing data and then restore that data to a different server running Prime Infrastructure 2.2:
- Cisco Prime Infrastructure 2.1.2 (with the UBF patch)
- Cisco Prime Infrastructure 2.1.1 (with the UBF patch)
- Cisco Prime Infrastructure 2.1.0.0.87
- Cisco Prime Infrastructure 1.4.2
- Cisco Prime Infrastructure 1.4.1
- Cisco Prime Infrastructure 1.4.0.45
If you are using a version earlier than 1.4.0.45 or 2.1.0.0.87, you will need to upgrade your server to version 2.1.0.0.87 (or version 1.4.0.45) before taking the backup.”
So in this post we will see what it involved to go to PI2.2 from a previous release. In my case, I am running PI 2.1.0.0.87 where I can directly take backup & restore of a PI 2.2 server.
First of all you need to build your PI2.2 server using .ova files available on CCO page(Downloads Home-> Products-> Cloud and Systems Management-> Routing and Switching Management-> Network Management Solutions-> Prime Infrastructure-> Prime Infrastructure 2.2-> Prime Infrastructure Software-2.2).
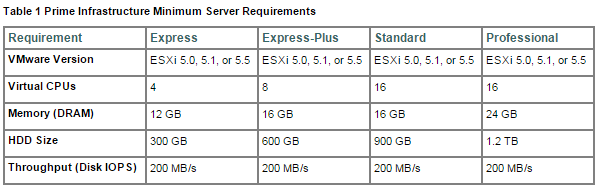
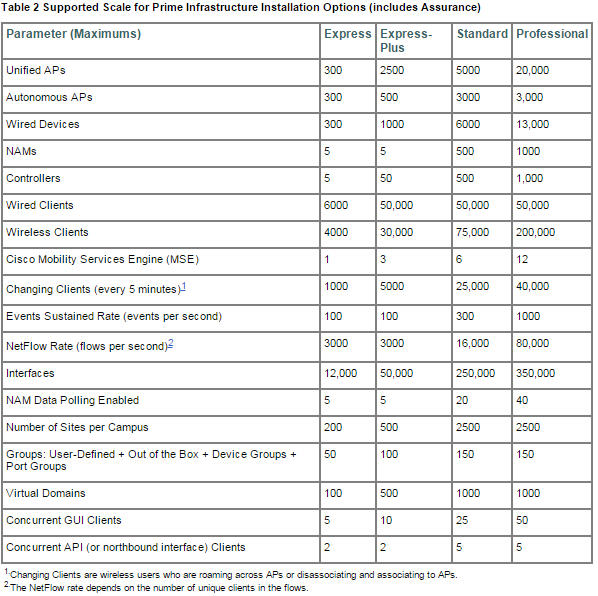
Since I am using VM, I have used PI-VA-2.2.0.0.158.ova to build the VM. Depend on the scale of your network, you need to size the VM accordingly. Below shown the minimum server requirement & supported scale for each type of installation.
 Once you build the PI2.2 VM, then you need to backup & restore the existing PI application backup.
I have used remote-backup option where I can backup existing config onto a remote FTP server. You can configure a remote FTP repository as shown below. I have given a name called “ftpserver” & specify its IP address & username password.
prime2/admin(config)# repository ftpserver
 prime2/admin(config-Repository)# url ftp://x.x.y.214
 prime2/admin(config-Repository)# user <username> password plain <ftp_password>
 prime2/admin(config-Repository)# exit
You can verify the remote ftp server using below command where it should listed all files available in that FTP server
prime2/admin# show repository ftpserver
 10_14_7_247_140918_0230.cfg
.
Then you can backup your Prime Application configuration onto that FTP server as shown below. Note that depend on the database size, time taken for the backup may vary. In my case it took around 50min to complete this backup process.
prime2/admin# backup PI-Backup ?
 repository  Repository to store backup in
prime2/admin# backup PI-Backup repository ?
 <WORD>  Repository name (Max Size - 80)
prime2/admin# backup PI-Backup repository ftpserver ?
 application  Application-only backup, excludes OS system data
 <cr>         Carriage return.
prime2/admin# backup PI-Backup repository ftpserver application ?
 <WORD>  Application name to be backed up (Max Size - 255)

prime2/admin# backup PI-Backup repository ftpserver application NCS

% Creating backup with timestamped filename: PI-Backup-141218-1452.tar.gpg
 Backup Started at : 12/18/14 14:52:29
 Stage 1 of 7: Database backup ...
 Database size: 96G
 -- completed at  12/18/14 15:13:42
 Stage 2 of 7: Database copy ...
 -- completed at  12/18/14 15:13:42
 Stage 3 of 7: Backing up support files ...
 -- completed at  12/18/14 15:14:57
 Stage 4 of 7: Compressing Backup ...
 -- completed at  12/18/14 15:15:26
 Stage 5 of 7: Building backup file ...
 -- completed at  12/18/14 15:31:29
 Stage 6 of 7: Encrypting backup file ...
 -- completed at  12/18/14 15:37:42
 Stage 7 of 7: Transferring backup file ...
 -- completed at 12/18/14 15:40:29
 Total Backup duration is: 0h:48m:0s
Note that I have shutdown the old VM & use same hostnames , IP for the new VM. Once new VM built,You can define a remote FTP repository specifying the same FTP server where config backed up.
prime2/admin(config)#repository ftpserver
 prime2/admin(config-Repository)# url ftp://x.x.y.214
 prime2/admin(config-Repository)# user <username> password plain <ftp_password>
 prime2/admin(config-Repository)# exit

 prime2/admin# show repository ftpserver
 10_14_7_247_140918_0230.cfg
Then you can restore the backed up configuration as shown below. Note that there are some important notes displayed where you have to pay attention. You have to be patient & it will take around 1.5 hours (again depend on your PI database size)
 prime2/admin#restore PI-Backup-141218-1452.tar.gpg repository ftpserver application NCS

* NOTE *
 If the system console is disconnected or got cleared on session timeout
 run 'show restore log' to see the output of the last restore session.

Restore will restart the application services. Continue? (yes/no) [yes] ? yes

DO NOT press ^C while the restoration is in progress
Aborting restore with a ^C may leave the system in a unrecoverable state

Initiating restore.  Please wait...
 Restore Started at 12/18/14 16:22:42
 Stage 1 of 9: Transferring backup file ...
 -- completed at 12/18/14 16:24:48
 Stage 2 of 9: Decrypting backup file ...
 -- completed at  12/18/14 16:32:13
 Stage 3 of 9: Unpacking backup file ...
 -- completed at  12/18/14 16:32:15
 Stopping strongSwan IPsec...
 Stage 4 of 9: Decompressing backup ...
 -- completed at  12/18/14 16:42:23
 Stage 5 of 9: Restoring Support Files ...
 -- completed at  12/18/14 16:42:27
 Stage 6 of 9: Restoring Database Files ...
 -- completed at  12/18/14 16:42:45
 Stage 7 of 9: Recovering Database ...
 -- completed at  12/18/14 17:04:49
 Stage 8 of 9: Updating Database Schema ...
 Stage 1 of 5: Pre Migration Schema Upgrade ...
 -- completed at: 2014-12-18 17:24:06.287, Time Taken : 0 hr, 15 min, 21 sec
 Stage 2 of 5: Schema Upgrade ...
 : This could take long time based on the existing data size.
 -- completed at: 2014-12-18 17:34:56.075, Time Taken : 0 hr, 10 min, 49 sec
 Stage 3 of 5: Post Migration Schema Upgrade ...
 -- completed at: 2014-12-18 17:44:13.068, Time Taken : 0 hr, 9 min, 16 sec
 Stage 4 of 5: Enabling DB Constraints ...
 -- completed at: 2014-12-18 17:44:39.7, Time Taken : 0 hr, 0 min, 22 sec
 Stage 5 of 5: Finishing Up ...
 -- completed at: 2014-12-18 17:44:52.668, Time Taken : 0 hr, 0 min, 12 sec
 -- completed at  12/18/14 17:45:18
 Stage 9 of 9: Re-enabling Database Settings ...
 -- completed at  12/18/14 17:45:18
 Total Restore duration is: 01h:22m:36s
 INFO: Restore completed successfully.

Starting PI Server... This may take some time
 Passwd reset alread in progress
Starting Prime Infrastructure...
This may take a while (10 minutes or more) ...
 Prime Infrastructure started successfully.
Starting strongSwan 5.0.1 IPsec [starter]...

prime2/admin# show application status NCS
Health Monitor Server is running.
Matlab Server Instance 1 is running
Ftp Server is running
Database server is running
Matlab Server is running
Tftp Server is running
NMS Server is running.
Matlab Server Instance 2 is running
Plug and Play Gateway is running.
SAM Daemon is running ...
DA Daemon is running ...
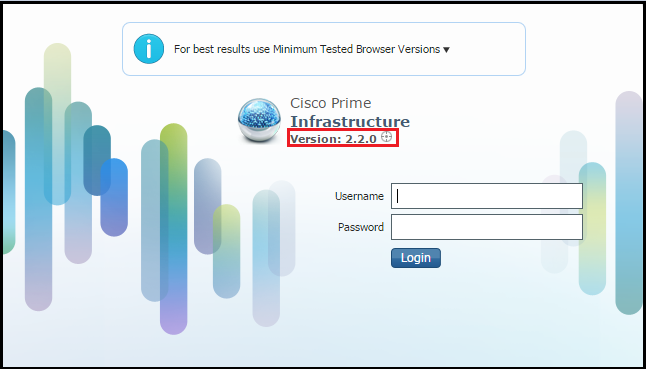
If everything went well you should be able to log onto your PI2.2 & enjoy the features of new version 🙂 .
 .
.

Thanks Rasika, the one thing they don’t mention is the hardware appliance upgrade… I assume this works in the same way though you’ll need to burn a DVD from the ISO image and be onsite to install v2.2
Yes Rob, no info on that.
What I heard is those appliances may go EoS beyond PI 2.2 & VM is the way forward.
HTH
Rasika
I need to restore cisco prime with appliance backup as i dont have application backuo. No cisco forum has this info. Is there a way to restore only with appliance backup.
I do not know the answer, hope someone else will respond to this if they know the answer.
HTH
Rasika
Rob,
If you have access to the CIMC you may be able to attach a virtual DVD to it and boot from the ISO on your remote hard drive. It may be slow but should be possible. Definitely being on the local LAN would be preferable.
I have got the info that there will be a new HW-appliance coming in March. You may upgrade to PI 2.2 if you have the current HW-appliance with 300GB disks as the one with 146GB disks don’t meet the requirements. We have the smallest appliance so I’m currently investigating on how to go forward.
I have been told there will be a new PI Appliance with updated specs coming out in March. The old Appliance should work with PI 2.2 if it has the upgraded disks option (600GB).
Thanks for the info
Hi,
how can i know what type of disk are in PI? I mean, is there any shell/GUI commando to get this info?
hii Rasika,
I ahve configured netflow in the cisco routers and switches.. My requirement is to get the source and destination of the traffic.
Regards
TD
Hi Thushara,
What is your netflow collector ? Is it Prime Infrastructure ? If you have standard netflow collector, then source & destination are standard filed of netflow.
HTH
Rasika
Hi Rasika,
A couple of questions seeing as you always seem to know the answers!
1) I’m running 2.0.x so am planning to upgrade to 2.1.2 and not 2.2 due to the requirement to convert to a completely new installation. As far as I’m aware 2.1.2 supports code 8.0.x as well (which is the reason we are upgrading). Is there a major reason why I should push for a move to 2.2? This particular contract doesn’t use ISE.
2) When performing a DB backup, it is 212 GB which seems insanely large. There are ~250 WLCs and 6000APs. Does that size seem normal to you?
Thanks for your help 🙂
Ric
I have a PI Appliance with 300GB drives and migrated from 2.1 to 2.2 with no issues. Please be advised if you have these drives that a Field notice exists. FN63645. The upgrade procedure is to export the backup and boot the appliance using the DVD created with the ISO of 2.2. You will be prompted with an option to install the new OS. Use the ‘setup’ to bring the appliance online and then copy and import the data back to the original state. It took ~1hr to complete the import with 15GB backup for 50 WLC and 1500 APs. Details such as SSL certificate, In addition to the devices, Login banner, Base/Lifecycle Licenses were all carried over in the exercise. It appears to be a notable improvement from 2.1 and IMO is worth the effort. Hope this is of use. Regards
Jason
Hi Jason,
I do not have these appliances & disk drives. Hope someone from my blog readers could help you.
HTH
Rasika
Hi Jason,
Are you saying that you can install the PI 2.2 on your existing PI 2.1 appliance? I am not sure if this can be done since I am actively looking for the answer for that. Our current NCS appliance (PI 2.1.0.0. 87) has 896.90GB capacity. I wonder if it possible to just install the PI 2.2 (using the .iso image DVD) and restore the backup of PI 2.1 back onto it. I copy my hardware specs here and wonder if you can verify if it is similar to yours. Thanks in advance…
sh inventory
NAME: “PRIME-NCS-APL-K9 chassis”, DESCR: “PRIME-NCS-APL-K9 chassis”
PID: PRIME-NCS-APL-K9 , VID: V02 , SN: KQ8XXX
Total RAM Memory: 16278820 kB
CPU Core Count: 16
CPU 0: Model Info: Intel(R) Xeon(R) CPU E5620 @ 2.40GHz
CPU 1: Model Info: Intel(R) Xeon(R) CPU E5620 @ 2.40GHz
CPU 2: Model Info: Intel(R) Xeon(R) CPU E5620 @ 2.40GHz
CPU 3: Model Info: Intel(R) Xeon(R) CPU E5620 @ 2.40GHz
CPU 4: Model Info: Intel(R) Xeon(R) CPU E5620 @ 2.40GHz
CPU 5: Model Info: Intel(R) Xeon(R) CPU E5620 @ 2.40GHz
CPU 6: Model Info: Intel(R) Xeon(R) CPU E5620 @ 2.40GHz
CPU 7: Model Info: Intel(R) Xeon(R) CPU E5620 @ 2.40GHz
CPU 8: Model Info: Intel(R) Xeon(R) CPU E5620 @ 2.40GHz
CPU 9: Model Info: Intel(R) Xeon(R) CPU E5620 @ 2.40GHz
CPU 10: Model Info: Intel(R) Xeon(R) CPU E5620 @ 2.40GHz
CPU 11: Model Info: Intel(R) Xeon(R) CPU E5620 @ 2.40GHz
CPU 12: Model Info: Intel(R) Xeon(R) CPU E5620 @ 2.40GHz
CPU 13: Model Info: Intel(R) Xeon(R) CPU E5620 @ 2.40GHz
CPU 14: Model Info: Intel(R) Xeon(R) CPU E5620 @ 2.40GHz
CPU 15: Model Info: Intel(R) Xeon(R) CPU E5620 @ 2.40GHz
Hard Disk Count(*): 1
Disk 0: Device Name: /dev/sda
Disk 0: Capacity: 896.90 GB
Disk 0: Geometry: 255 heads 63 sectors/track 109053 cylinders
NIC Count: 2
NIC 0: Device Name: eth0
NIC 0: HW Address: 34:40:B5:D7:DC:90
NIC 0: Driver Descr: eth0: Broadcom NetXtreme II BCM5709 1000Base-T (C0) PCI Express found at mem 92000000, IRQ 169, nod
e addr 3440b5d7dc90
NIC 1: Device Name: eth1
NIC 1: HW Address: 34:40:B5:D7:DC:92
NIC 1: Driver Descr: eth1: Broadcom NetXtreme II BCM5709 1000Base-T (C0) PCI Express found at mem 94000000, IRQ 122, nod
e addr 3440b5d7dc92
(*) Hard Disk Count may be Logical.
Hi Ric
There are a few good features in PI 2.2 that are worth looking at.
I’ve just installed 2.2 on an applicance (Gen 1) and currently as I speak restoring from a PI 2.1 backup. I have tested 2.2 on a test VM and I did see that the Lightweight Access Point Templates page has been greatly improved.
Also with PI 2.1 you can only select a maximum of 1000 AP’s per template but with 2.2 that number increases to 6000. We have 10,000 AP’s across 4 FlexConnect 7510 WLC’s.
I have also sent our account manager at Cisco a feature request for the following.
1) Being able to provision the Master AP under the FlexConnect Group without having the AP associated.
This is because we have 750 FlexConnect Groups spread across the 4 FlexConnect controllers and want to be able to create all of them using templates in PI and then push them to all FlexConnect controllers so that in the event of one of controllers failing failing and all access points jumping over, everything will be ready to go. Also for WLC / AP upgrades as well.
2) Being able to report on which AP is in what FlexConnect Group. It is very hard to administer FlexConnect’s even still with PI 2.2.
Thank you.
Thanks, Jason. It is great info! I upgraded to 2.1.2 last week but will keep this in mind depending on how Cisco bring out their next versions. In the past they’ve released one like 2.2 where you have to do a full re-install only to release another version that is upgradeable from lower versions without a re-install. We shall see!
Philip – Thank you also! The Flexconnect features are not something I use much but there are a couple of projects on the horizon that might change this and make me consider 2.2.
Ric
Thanks for the condensed version of upgrade steps, now if they could just start allowing a direct upgrade, that would be great…
I do not think that will happen due to OS & database changes in the new system. Refer the attach roadmap document which gives some info on that.
HTH
Rasika
I just finished installing a 2.1 hardware appliance. It’s a heartbreak to see that 2.2 is a forklift upgrade.
Yes, that’s true.
But you should be fine with 2.1 to 2.2 upgrade as outlined.
HTH
Rasika
Hi All
I have a .pdf from Cisco outlining their plans for PI starting with 2.2 and all the hardware changes. I’m not sure how to upload it to this site for you gents to be able to see it. Any help would be greatly appreciated.
Thank you.
If u like send it to mrncciew@gmail.com, i will upload it to this post.
By the way thanks for sharing all ur inputs here to help others
Sent.
Thanks.
I uploaded it. (sorry had to remove it due to some roadmap information should not be publicly available)
Hi,
Do you have maps in your system and if so were they there after the backup was reinstalled?
Yes, in my case I can see them properly. I heard some issues if you moved from 1.4.x to 2.2 related to this
https://supportforums.cisco.com/discussion/12390246/issue-pi-22-after-upgrade
HTH
Rasika
what about licensing in the upgrabe process ?
does the application backup take the license file into account ?
Yes, back up will include the license info as well
HTH
Rasika
Just a quick question on this…I’m about to try this on our fairly new physical appliance. At the beginning of the backup process, it said the database was 33G, but the backup file it created is only 1.6G. Am I safe to assume the difference in size is due to some sort of compression the backup performs? I just want to make sure my backup file is good before I proceed with installing the new version.
Hello, I’ve PI 2.2 and I tried to backup MSE to a remote server. I set a ftp/sftp repository on “running-conf” but when I launch backup (from “Services/mobility services Engine” I can only chose Backups located at: Local FTP Server and I don’t know how to add other choices (I saw others choices before). In fact i would save MSE, WLC and logs to a remote server and I’m unable to do that for MSE.
Documentation aren’ good enough!
Hi All,
Be aware off a known bug in PI 2.2 with archivelogs and
Prime Infrastructure Server Backup (Background task) If you change the default interval backup from 1 to another value (for example 7)then watch out /dev/mapper/smosvg-optvol . This can grow very quickly (In our area 25 G per day) and can kill you database! (don’t remove the files manually(!)
ade # pwd
/opt/oracle/base/fast_recovery_area/WCS/archivelog
ade # du -sh ./*
4.0K ./2015_01_25
29G ./2015_01_26
27G ./2015_01_27
25G ./2015_01_28
23G ./2015_01_29
25G ./2015_01_30
21G ./2015_01_31
28G ./2015_02_01
You are now warned ….
Thanks a lot for this useful information
Hi All
I have some more info to share on PI 2.2
Please be are when discovering templates from WLC’s that the Local Passwords under the usernames within the FlexConnect Groups are NOT discovered and you have to manually update them all.
Lucky I had the ability to update all the Password values in the DB as I watched Cisco get into the DB of Prime and I’ve capture all their efforts.
NOTE: A new password is generated every session. For security reasons I have changed my units hostname to PI-HOST.
***** ACCESSING PRIME’S DATABASE *****
login as: admin
password:
Last login: Wed Jan 28 08:54:03 2015 from 172.23.11.53
PI-HOST/admin#
PI-HOST/admin# root
Enter root password :
Starting root bash shell …
ade # cd /opt/CSCOlumos/bin
ade # ./getDatabaseParams.sh
Zt7FUx0WU1nzRI1m
ade # cd /opt/
ade # su – oracle
[oracle@PI-HOST ~]$ . ./oracleenv
[oracle@PI-HOST ~]$ sqlplus wcsdba/Zt7FUx0WU1nzRI1m
SQL*Plus: Release 11.2.0.4.0 Production on Wed Jan 28 11:39:38 2015
Copyright (c) 1982, 2013, Oracle. All rights reserved.
Connected to:
Oracle Database 11g Enterprise Edition Release 11.2.0.4.0 – 64bit Production
With the Partitioning, OLAP, Data Mining and Real Application Testing options
SQL>
SQL> exit
Disconnected from Oracle Database 11g Enterprise Edition Release 11.2.0.4.0 – 64bit Production
With the Partitioning, OLAP, Data Mining and Real Application Testing options
logout
TERM environment variable not set.
ade #
***** ACCESSING PRIME’S DATABASE *****
Hi All
I have some more info to share on PI 2.2
When exporting a predictive site survey from AirMagnet to NCS / WCS. The AP’s are in “Planning Mode” and you have to manually go in and change them one by one to “Deployed Mode”. I have to do this for 800+ sites which was going to be a huge pain. I tried to do one site manually and then export it do I could via the .xml file within the export to find out the details and by default the file is encrypted.
In the end I figured it out and below are the two examples of how AirMagnet produces the file and how it needs to be in order for it to go in one shot and nothing needs to be doen afterwoods as long as the AP’s are associated.
***** AIRMAGNET *****
***** MODIFIED BEFORE GOING INTO PRIME 2602i AP’s *****
As you can see there is so much more info that needs to be added in, but I have scripted this all up so I can bulk add all 800 sites in at once with all AP’s placed on the MAPS and in the deployed state.
Thank you.
For some reason this webpage didn’t accept all the code. I will need to supply .txt examples then.
Are you able to add in the .txt examples here for us?
Philip, If you can find a way to share the script /.txt file please do. Very interested in doing just that here.
Hi I have some question about Prime 2.2
since I can’t find UDI (or VUDI) to register with PAK Key since before it in Administrator -> License. and it not even in about popup
How I can find it ? or how can I register PAK Key ? With out UDI ?
Thanks
You should able to see it under “Administration > settings > Appliance > UDI”
Hello,
I have a question to you. My partner has a wcs. he wants to upgrade his controller. I will offer wism2 with 8.0 airios. so we have to go with prime. But, is it possible to upgrade from wcs to prime 2.2? I found some information on the quick start guide and ordering guide. But, still i am not clear about it. Do i need to order a whole new prime with proper licensing? What should i do?
Sorry for late response.
If you have support on WCS, ask Cisco to rehost WCS license to Prime. You have to buy Prime Infrastrcture.
HTH
Rasika
Hello, there is a slight problem with the steps detailed on this post.
If you backup the “application NCS” as per the command show in the post “prime2/admin# backup PI-Backup repository ftpserver application NCS”, then you also have to restore with the “application NCS” at the end of the restore command.
The command on the post is ” prime2/admin#restore PI-Backup-141218-1452.tar.gpg repository ftpserver ” it is missing “application NCS” at the end.
Otherwise you will get the following error
prime2/admin# restore backupfile.gpg repository temp
* NOTE *
If the system console is disconnected or got cleared on session timeout
run ‘show restore log’ to see the output of the last restore session.
Restore will perform a reboot to successfully complete. Continue? (yes/no) [yes] ? yes
DO NOT press ^C while the restoration is in progress
Aborting restore with a ^C may leave the system in a unrecoverable state
Initiating restore. Please wait…
Restore Started at 03/07/15 17:28:41
Stage 1 of 9: Transferring backup file …
— completed at 03/07/15 17:29:55
Stage 2 of 9: Decrypting backup file …
— completed at 03/07/15 17:34:23
Stage 3 of 9: Unpacking backup file …
ERROR: Backup you are trying to restore is application backup. Please retry restore using the following command: “restore repository application NCS”
% System restore failed
Hi David
I am trying to upgrade Prime Infrastruce 2.1.0.0.87 to 2.2
I have successfully restore from the application backup.
But getting error when I am trying to restore the appliance from appliance backup.
What I did is as below.
1. To perform application backup: backup appbackup repository primebackup application NCS
2. once the backup was application backup was completed, performed appliance backup using: backup appliancebackup repositiry primebackup
3. Restore application using restore command with application NCS – was successful.
4. Tried restoring using appliance backup file, it showed me error stating “Backup file is an appliance backup from an unsupported version. Please retry restore with PI 2.2 version appliance backup”
Any suggestion please?
Hi,
I have some problems with adding MSE to Prime 2.2. I did a fresh installation of Prime 2.2 as a VM. The MSE also has the latest code running (8.0.110.0). Both of them are in the same subnet, Prime is on 10.70.9.10 and MSE on 10.70.9.5 and both the devices can ping each other. But when I try and add the MSE to the Prime I get the following error “No response from Server. It may be unreachable, or server is down or HTTPS connection to server failed”. Can you please let me know where I am going wrong?
Thanks,
@Gunners
Hi,
I figured out the problem. 🙂 There was credential mismatch between the Prime and the MSE. Now I have run into another problem. I am trying to sync the WLC to the MSE. NMSP status on Prime and MSE is “inactive”. This is even after matching the MSE Key Hash with the Controller Key Hash. The Prime still shows “Controller Keyhash matches with the MSE” as “X” under NMSP Troubleshooting Checklist. Any thoughts?
Thanks,
@Gunners
Got everything up and running :). Looked at one of your articles about NMSP. Thanks a lot!
-@Gunners.
Good to hear that 🙂
Hi guys,
I am in the same boat here and I´d like to ask something. As I restored a database from a Prime that currently uses TACAS, I got locked out of web interface. Even after manually create web user, I can´t log in. Is there a way to change tacas config through cli ? I am looking for that for quite a while and nothing so far. Well, I am presume this is the cause. I may be wrong for sure.
I know this post is a bit old but just in case someone still look at it.
Thanks!
Hi,
Not sure you have facing this problem before, i currently using the virtual Prime 2.1 and trying upgrade to virtual Prime 2.2 with new installation, but when i try to boot up the virtual Prime 2.2. the VM server show me with some error message ” insufficient resource to satisfy configured failover level for vSphere HA.” and i using ESXI 5.5. Both Prime i choose standard spec, but Prime 2.1 able boot up without any issue but Prime 2.2 unable to boot up.
Hi,
I’m looking forward to deploy Cisco prime infra 2.1
Just wonder, can I activate the Cisco prime infra 1.2 base license to a hardware appliance that running on Cisco prime infra 2.1?
Thanks
I am not sure, check with Cisco TAC if you have support
Rasika
alexchin,
Assuming it has never been activated – yes. A Base (and Lifecycle) license from 1.2 will work on 2.1. (Assurance licenses will not.) If the license (or, properly speaking, the PAK) had been previously activated – i.e a license file issues – you would need to conttact the TAC and ask for Global licensing to re-issue the license keyed to the new UDI.
Note that as of 2.2, licenses are not node-locked – meaning they are portable across VMs or appliances if you upgrade / re-image.
Thanks Marvin for responding to these queries, really appreciated
Rasika
Thanks for the write-up, it was very helpful. Just upgraded our Gen1 appliance. Spun up a VM with the same amount of memory and CPUs and restored there first. Then updated the appliance using the Gen1 .iso from Cisco and restored to it. Only thing that did transfer was the certificate we had installed which was no big deal since I still had it.
Thanks for info Rob
Hi nayarasi,
i need to know if and how Cisco PI 2.2 check on Cisco routers security vulnerabilities (if the same function of Cisco Security Advisories executed bu Cisco PI 2.2 or any version).
appreciation
thanks in advance
Thanks. I am getting this error
— completed at 04/14/15 19:17:14
Stage 9 of 9: Re-enabling Database Settings …
— completed at 04/14/15 19:17:14
Total Restore duration is: 01h:00m:00s
INFO: Restore completed successfully.
Starting PI Server… This may take some time
Starting Prime Infrastructure…
This may take a while (10 minutes or more) …
Failure during Prime Infrastructure startup. Check launchout.log for details.
Starting strongSwan 5.0.1 IPsec [starter]…
Prime01/admin#
After restoring the backup file it says failure during Prime Infra…. but when I checked the GUI everything is there. What is causing it? THanks
Hi, I’m running into the same issue…did you get it resolved? Thanks
Hello!! Im fan of your blog!!
Could you help me with a doubt about CISCO PRIME APPLIANCE??
The ETHERNET 2 Port in the CISCO PRIME INFRASTRUCTURE APPLIANCE. Is it in use??
Can i connect my network in this port? O what is the purpose of ETHERNET 2 port?
I appreciate your time!!
Regards!!!
Replied to your query on CSC. Refer below as it explain this.
https://supportforums.cisco.com/discussion/11856911/need-use-both-ports-prime-ncs-apl-k9
HTH
Rasika
I would like information if AP over 20000 unit You can recommend solution for cisco prime
Haven’t manage that sort of large network 🙂
Cisco only got PI for all
Rasika
Hi nayarasi
i see MSG DOC> a long time to execute on a database with a large number of invalid
Hi,
I am in process of you testing upgrade from 2.1 to 2.2 in my lab. I just created the backup and found a strange thing. When the backup started, it mentioned the database size to be 56GB. However, once the backup completed, the file on ftp was only 800MB. Pasting the snapshot. Is it supposed to be like this? Do I just restore this exact file to the new VM PI 2.2.
backup PI_Backup repository ftpserver application NCS
DO NOT press ^C while the backup is in progress
Aborting backup with a ^C may terminate the backup operation or the backup file may be corrupted
Backup Started at : 06/30/15 09:56:10
Stage 1 of 7: Database backup …
Database size: 56G
— completed at 06/30/15 10:03:29
Stage 2 of 7: Database copy …
— completed at 06/30/15 10:03:29
Stage 3 of 7: Backing up support files …
— completed at 06/30/15 10:03:32
Stage 4 of 7: Compressing Backup …
— completed at 06/30/15 10:03:35
Stage 5 of 7: Building backup file …
— completed at 06/30/15 10:04:42
Stage 6 of 7: Encrypting backup file …
— completed at 06/30/15 10:05:08
Stage 7 of 7: Transferring backup file …
— completed at 06/30/15 10:06:27
% Backup file created is: PI_Backup-150630-0956__VER2.2.0.0.158_BKSZ55G_FIPS_ON_CPU4_MEM4G_RAM11G_SWAP15G_APP_CK3880690046.tar.gpg
Total Backup duration is: 0h:10m:17s
Thanks
Just thought I’d share my feedback on this! I spun up another VM with the right allocations (after persuading our server guys I genuinely needed the resources) and did a full application backup and restore from old to new. Even though it all seemed to go through successfully there was no data in 2.2 following the restart so I ended up simply running the two VMs side by side and imported / exported the data over.
One thing that did catch me out was when exporting the maps I exported them in metres but this CPI imports them in feet which blows your maps out 3x the size so be careful to change your map properties to feet prior to exporting on the old version!
Pingback: Cisco Prime Infrastructure 2.2 Migration | Ripples in Harmony
Managed to install a PI 2.1 backup over a PI 2.2 server.
Backup and restore that selve is not so difficult.
After the installation, I see that the /opt/oracle/base/diag/rdbms/wcs/wcs/trace directory is rapidly filling up with trace files
466M ./wcs_ora_12498.trc
16K ./wcs_ora_12498.trm
960M ./wcs_ora_12500.trc
28K ./wcs_ora_12500.trm
835M ./wcs_ora_12598.trc
20K ./wcs_ora_12598.trm
961M ./wcs_ora_12978.trc
28K ./wcs_ora_12978.trm
754M ./wcs_ora_13055.trc
20K ./wcs_ora_13055.trm
130M ./wcs_ora_13058.trc
4.0K ./wcs_ora_13058.trm
458M ./wcs_ora_13143.trc
24K ./wcs_ora_13143.trm
459M ./wcs_ora_15405.trc
24K ./wcs_ora_15405.trm
961M ./wcs_ora_15509.trc
28K ./wcs_ora_15509.trm
1.4G ./wcs_ora_20976.trc
36K ./wcs_ora_20976.trm
745M ./wcs_ora_21185.trc
20K ./wcs_ora_21185.trm
456M ./wcs_ora_22178.trc
20K ./wcs_ora_22178.trm
992M ./wcs_ora_22180.trc
20K ./wcs_ora_22180.trm
825M ./wcs_ora_22189.trc
20K ./wcs_ora_22189.trm
457M ./wcs_ora_22193.trc
24K ./wcs_ora_22193.trm
968M ./wcs_ora_22195.trc
24K ./wcs_ora_22195.trm
620M ./wcs_ora_22219.trc
16K ./wcs_ora_22219.trm
465M ./wcs_ora_22232.trc
Is this already a known bug at Cisco?
Hi, can we install PI2.2 directly on Appliance1, without any previous data backup.
@ RDP – the backup is only necessary of you need / want to restore previous data (and license). Otherwise it will work fine.
Thanks Marvin keep helping readers of this blog 🙂
Hi,
I am restoring a backup from Cisco Prime 2.1.2 on a 2.2 Prime installation.
All goes well up until stage 8of9. It has been busy with this for over 14 hours now.
Is this normal? The Backup file is app. 31GB large.
Should I wait?
Started at : Wed Oct 28 15:52:36 2015
Initiating restore. Please wait…
Restore Started at 10/28/15 15:53:35
Stage 1 of 9: Transferring backup file …
— completed at 10/28/15 16:07:49
Stage 2 of 9: Decrypting backup file …
— completed at 10/28/15 16:32:17
Stage 3 of 9: Unpacking backup file …
— completed at 10/28/15 16:32:45
Stage 4 of 9: Decompressing backup …
— completed at 10/28/15 16:37:23
Stage 5 of 9: Restoring Support Files …
— completed at 10/28/15 16:38:08
Stage 6 of 9: Restoring Database Files …
— completed at 10/28/15 16:38:44
Stage 7 of 9: Recovering Database …
— completed at 10/28/15 17:54:07
Stage 8 of 9: Updating Database Schema …
It took 2.5h for a 3.2gig db in my case (vmware)
VMNMS01/admin# restore DB_EXPORT-2.1.0.0.87-to-2.2.0.0.158-ONLY_NCS-160113-1047.tar.gpg repository primeupdate application NCS
* NOTE *
If the system console is disconnected or got cleared on session timeout
run ‘show restore log’ to see the output of the last restore session.
Restore will restart the application services. Continue? (yes/no) [yes] ? yes
DO NOT press ^C while the restoration is in progress
Aborting restore with a ^C may leave the system in a unrecoverable state
Initiating restore. Please wait…
Restore Started at 01/13/16 12:30:28
Stage 1 of 9: Transferring backup file …
— completed at 01/13/16 12:31:43
Stage 2 of 9: Decrypting backup file …
— completed at 01/13/16 12:33:17
Stage 3 of 9: Unpacking backup file …
— completed at 01/13/16 12:33:18
Stopping strongSwan IPsec…
Stage 4 of 9: Decompressing backup …
— completed at 01/13/16 12:36:36
Stage 5 of 9: Restoring Support Files …
— completed at 01/13/16 12:36:36
Stage 6 of 9: Restoring Database Files …
— completed at 01/13/16 12:37:10
Stage 7 of 9: Recovering Database …
— completed at 01/13/16 13:34:35
Stage 8 of 9: Updating Database Schema …
Stage 1 of 5: Pre Migration Schema Upgrade …
— completed at: 2016-01-13 13:46:59.775, Time Taken : 0 hr, 8 min, 39 sec
Stage 2 of 5: Schema Upgrade …
: This could take long time based on the existing data size.
— completed at: 2016-01-13 13:53:14.483, Time Taken : 0 hr, 6 min, 14 sec
Stage 3 of 5: Post Migration Schema Upgrade …
— completed at: 2016-01-13 14:59:08.538, Time Taken : 1 hr, 5 min, 53 sec
Stage 4 of 5: Enabling DB Constraints …
— completed at: 2016-01-13 14:59:43.535, Time Taken : 0 hr, 0 min, 31 sec
Stage 5 of 5: Finishing Up …
— completed at: 2016-01-13 14:59:51.144, Time Taken : 0 hr, 0 min, 7 sec
— completed at 01/13/16 15:00:19
Stage 9 of 9: Re-enabling Database Settings …
— completed at 01/13/16 15:00:19
Total Restore duration is: 02h:29m:51s
INFO: Restore completed successfully.
Starting PI Server… This may take some time
Starting Prime Infrastructure…
This may take a while (10 minutes or more) …
can help me?
I have license KEY PAK of Prime Infrastructure 2.2 software.
But I dont really know my service contract number, i just purchased a license for cisco prime infrastruture 2.2
Can any help me up Prime Infrastructure 2.2 software IOS and share link for me pls?
Thanks very so much!
can help me, please?
I have installed cisco prime infrastructure for my customer. During configure add divice to CPI:
– I have a question: Is privilege of account access in network devices ? privileged 15 or 5 or ??
You should give Read/Write access to PI in order to manage network device. I would give privilege 15 access to device CLI
HTH
Rasika
Hi nayarasi,
Thanks for your quick support!
If account for purposes only backup configuration (configuration Archive) on network devices, privilege 15 is necessary ? Can I use lower privilege?
Best Regards,
HuyTV3
I think so. Test with different priviledge level & see if that works with lower priviledge as well
please help me!
Thank you so much
I have added WLC into cisco prime 3.1.
I need authorization for accounts on cisco prime that management or monitor WLC devices.
01 account have full authority configuration WLC
01 account can configuration WLC but restric several authorization (examble: It can add; delete MAC of client but can not create SSID in WLAN)
Please help me!
Thank you so much