
Cisco Mobility Services Engine (MSE) supports following services
1. Location Services
2. Wireless Intrusion Protection Service
3. Mobile Concierge
4. CMX Analytics Service
5. CMX Connect & Engage Service
In this post we will see how to upgrade MSE to 8.0.100.0 from 7.x release. Here is the MSE 8.0.100.0 release notes that you should be review prior to this upgrade.
Step1
First you have to download “CISCO-MSE-L-K9-8-0-100-0-64bit.bin.tar.gz” file from Cisco. It is important to note that if this downloaded from a Window system, some browsers modify the downloaded filename. In my case I used chrome on a Windows 7 PC & downloaded filename was “CISCO-MSE-L-K9-8-0-100-0-64bit.bin.gz“. If this happen, you have to rename the downloaded file to reflect its original name (CISCO-MSE-L-K9-8-0-100-0-64bit.bin.tar.gz)
Step2
Backup the MSE using prime infrastructure. Prior to MSE 7.6.x you have to back it up to the local FTP server. From 7.6.x onwards you can back it up to an external FTP server as well (see this for detail).
Step3
You can either use Prime Infrastructure to upgrade MSE, but I will use direct upgrade using the MSE CLI for this post.
You have to download the upgrade file (CISCO-MSE-L-K9-8-0-100-0-64bit.bin.tar.gz) from download software section of CCO, Products-> Wireless-> Mobility Services-> Cisco Mobility Services Engine-> Virtual Appliance Mobility Services Engine Software-8.0.100.0
Step4
You have to got to MSE CLI as root user & create a directory (named 8.0.100.0) in /opt/installers folder. You can copy the downloaded file to this folder. I have used WinSCP for this file transfer.
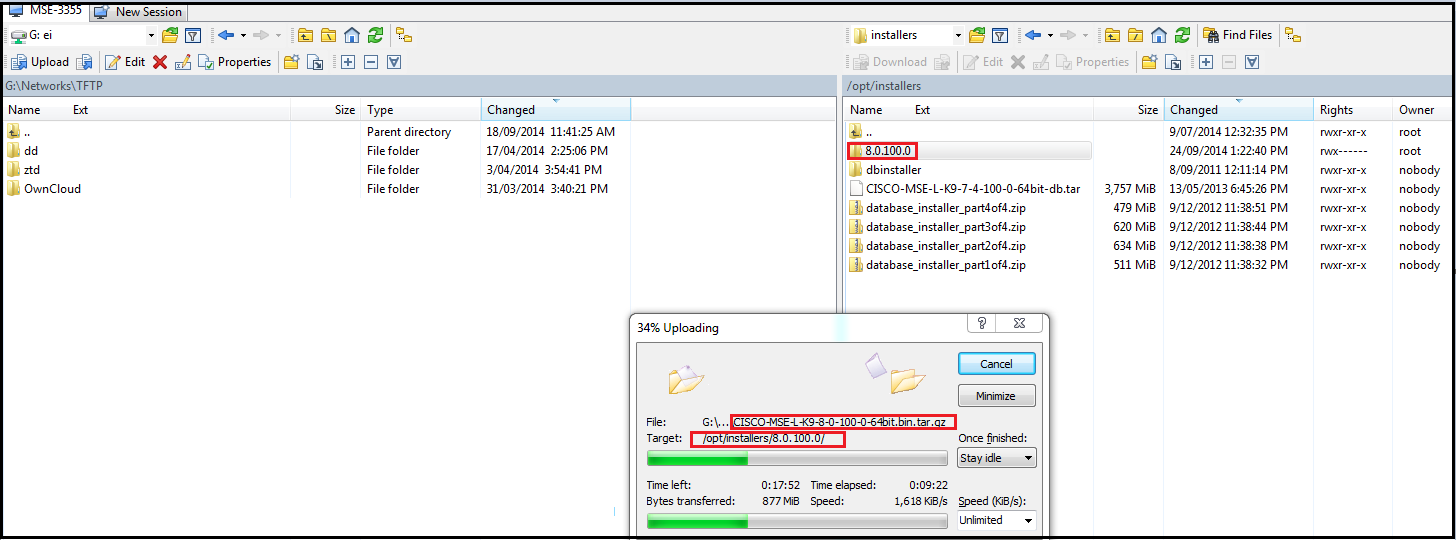 Step6
Step6
Once you copied the file you have to extract it using below command.
[root@mse]# cd /opt/installers/8.0.100.0/
[root@mse 8.0.100.0]#
[root@mse 8.0.100.0]# tar zxvf ./CISCO-MSE-L-K9-8-0-100-0-64bit.bin.tar.gz
CISCO-MSE-L-K9-8-0-100-0-64bit.bin
MSE_PUB.pem
signhash.bin
Step7
You have to stop the MSE services using the below CLI command.
[root@mse ~]# /etc/init.d/msed stop
Framework and services successfully shutdown. Shutting down database ......
MSE platform shutdown complete
Step8
Then you have to run the installer. Sometime “CISCO-MSE-L-K9-8-0-100-0-64bit.bin” file does not have execute permission for the root user. If not you can do that using “chmod +x CISCO-MSE-L-K9-8-0-100-0-64bit.bin” as shown below. Probably this will take around 30 min & system will rebooted once upgrade finishes.
[root@mse ~]#  /opt/installers/8.0.100.0/CISCO-MSE-L-K9-8-0-100-0-64bit.bin
-bash: /opt/installers/8.0.100.0/CISCO-MSE-L-K9-8-0-100-0-64bit.bin: Permission denied
!
[root@mse ~]# cd /opt/installers/8.0.100.0/
[root@mse 8.0.100.0]# chmod +x CISCO-MSE-L-K9-8-0-100-0-64bit.bin
!
[root@mse 8.0.100.0]#  /opt/installers/8.0.100.0/CISCO-MSE-L-K9-8-0-100-0-64bit.bin
Preparing to install...
Extracting the JRE from the installer archive...
Unpacking the JRE...
Extracting the installation resources from the installer archive...
Configuring the installer for this system's environment...

Launching installer...

Preparing CONSOLE Mode Installation...
===============================================================================
Cisco Mobility Services Engine    (created with InstallAnywhere by Macrovision)
-------------------------------------------------------------------------------

===============================================================================
Introduction
------------
InstallAnywhere will guide you through the installation of Cisco Mobility
Services Engine (MSE)

It is strongly recommended that you quit all programs and applications before
continuing with this installation.

Respond to each prompt to proceed to the next step in the installation.  If you
want to change something on a previous step, type 'back'.

PRESS <ENTER> TO CONTINUE:
===============================================================================
Installing MSE version: 8.0.100.0
===============================================================================
Installation Check
------------------

Cisco MSE upgrade procedure may take 30-50 minutes to complete, depending on
the amount of data on the system.
System reboot is required after upgrade is complete.

During the upgrade process, please ensure that the session to the MSE is not
terminated. User action is needed at the end of the installation process.

The system appears to have a Cisco Mobility Services Engine already installed.
If you choose "Continue", all  currently installed components will be removed
permanently (only database and license files will be preserved).

  ->1- Exit
    2- Continue

ENTER THE NUMBER OF THE DESIRED CHOICE, OR PRESS <ENTER> TO ACCEPT THE
   DEFAULT: 2
===============================================================================
MSE backup
----------
It is strongly recommended to take a backup of the MSE before proceeding with
the upgrade.
Have you completed a successful MSE backup?
  ->1- Yes
    2- No
ENTER THE NUMBER OF THE DESIRED CHOICE, OR PRESS <ENTER> TO ACCEPT THE
   DEFAULT: 1

==============================================================================
Current Role - Primary
----------------------
High Availability Role is set to Primary from previous installation.
To change role to Secondary or re-configure high availability settings, please
execute setup.sh after installation is completed.
==============================================================================
Auto Startup
------------
The Cisco MSE is configured to startup automatically at system boot up.
You can modify this setting using setup.sh after installation is completed.
===============================================================================
Installing...
-------------
 [==================|==================|==================|==================]
 [------------------|------------------|------------------|------------------]
==============================================================================
Database Installation
---------------------
The installer will now install the database. This may take a long time
(up to 30 minutes). Do not cancel the installer during this step.

 Installing Database files
 Step 1/3 - Installing Database files
 Step 1/3 Completed
 Step 2/3 - Configuring Database
 Step 2/3 Completed
 Step 3/3 - Updating patches
 Step 3/3 Completed

 Installation of database completed
==============================================================================
Post Installation
------------------
 Running Post-install scripts
 Step 1/2 - Installing Packages
 Step 1/2 Completed
 Step 2/2 - Configuring System Settings
 Step 2/2 Completed

 Completed Post install scriptsCommand.run(): process completed before monitors could start.
==============================================================================
Upgrade/Install Analytics Service
----------------------------------
This might take a while depending on the size of data on the system
 Step 1 - Installing 7_5 PATCH
 7_5 PATCH installed
 Step 2 - Installing LIQUIBASE PATCH
 LIQUIBASE PATCH installed
 Step 3 - Installing AGGREGATION PATCH
 Starting AGGREGATION PATCH at 12:28
 AGGREGATION PATCH completed at 12:30
Analytics upgrade is Complete
===============================================================================
Installation complete for upgrade
---------------------------------
Congratulations. Cisco Mobility Services Engine has been successfully installed
at:
/opt/mse

!!!! IMPORTANT NOTE !!!!
The system is minimally configured right now. It is strongly recommended that
you run the setup script under /opt/mse/setup/setup.sh to configure all
appliance related parameters immediately after installation is complete.

System components have been updated during installation.
Do you want to reboot now or later?
  ->1- Now
    2- Later

ENTER THE NUMBER OF THE DESIRED CHOICE, OR PRESS <ENTER> TO ACCEPT THE
   DEFAULT: 1
Rebooting system now....
Broadcast message from root (Thu Sep 18 12:30:54 2014):
The system is going down for reboot NOW!
Step 9
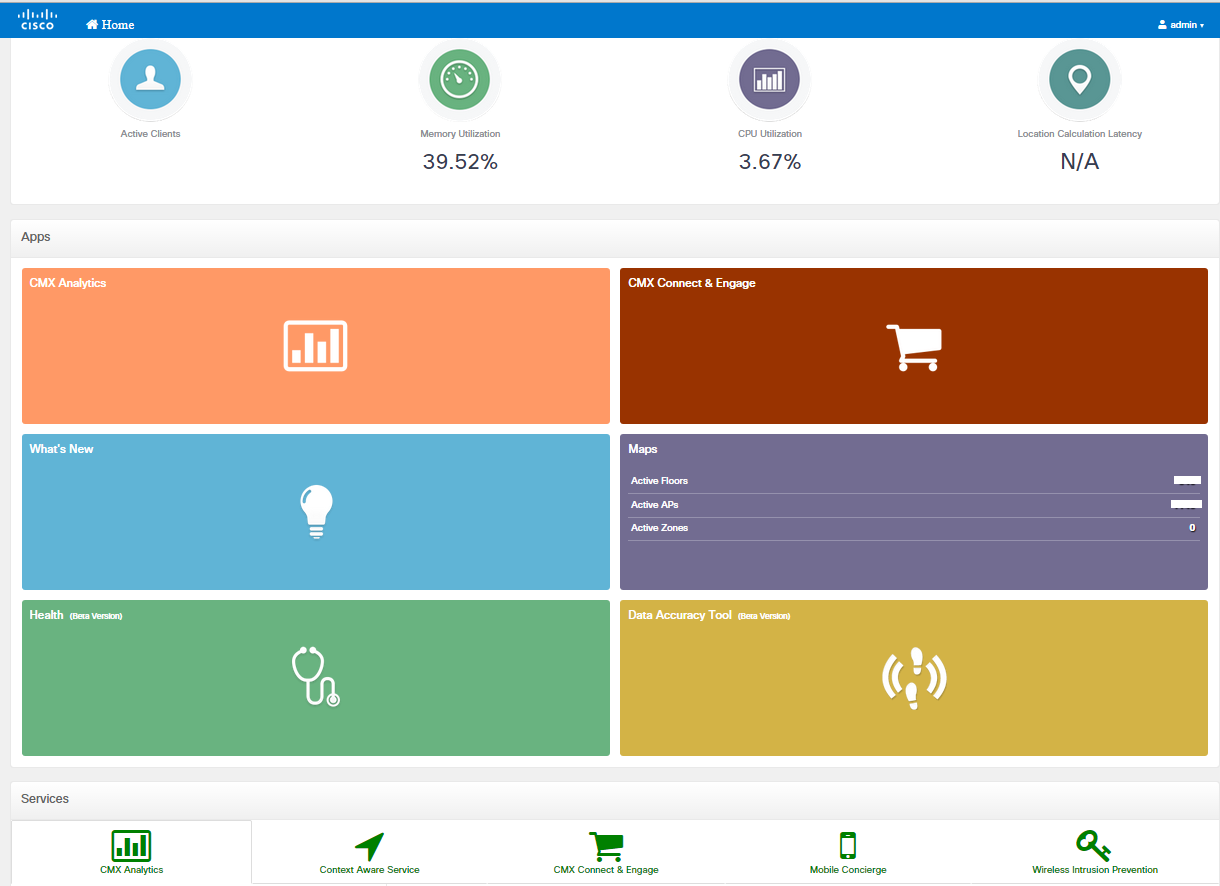
Once rebooted you can reach MSE using https://<MSE_IP_Address>/mseui/ URL as shown below. You have to use the credential created for Prime Infrastructure to communicate with MSE as you access it via HTTPS.
 It’s good idea to keep a back up of your MSE config once upgrade finishes & synchronize Network Designs, Controllers, etc. You can do that easily by going to “Configurations -> Maintenance -> Backup” option & pointing your FTP server where backup will stored, as shown below.
 Backup process will also take around 15-30min depend on the database size.
Related Posts

Hi,
only some comments about 7.6 and 8.0 versions.
MSE 8.0 will integrate FB connector. In 7.6 version FB connector was a separated virtual machine. This feature provide an authentication method using facebook, once you have logged with your facebook credentials, you were redirected to the facebook page of the customer.
in MSE 8.0 you don’t have to deploy another virtual machine, becasuse this feature is integrated in the MSE.
MSE 7.6 offers the posibilty of Visitor connector, you can configure a splash page or captive portal in the MSE, configuring WLC , WLAN with web authentication “passtrought”. MSE gives the posibility to use social connectors in order to authenticate users, but in 7.6 it doesn’t work properly, because once you click submit in the firts step the users are authenticate, no need to login with facebook, linkdn or google, so this feature in 7.6 it has no sense.
to fix this issue in 8.0 realese, social connector appears in the first step, so social login works.
In the other hand, 8.0 is not able to engage advertisement in HTTP, as 7.6 can do.
in 7.6 you can configure policy base routing in order to redirect HTTP traffic to MSE. MSE will terminate the HTTP connection of the client, and make his own connection to the server to get the URL, the internet server return the web page, the MSE modify the web, inserts the advice banners and send this modified web page to the client.
As far as i know this feature doesn’t exist anymore in 8.0
thank you very much for your blog Rasika!!!!
Regards
Thanks for adding some valuable information Juan.
Rasika
Awesome blog, thank you for all the information you post.
Should there be another step to decompress and extract the installer?
Hi Kyle,
Thank you very much for pointing that out. I have corrected it 🙂 Not sure how did I miss it 😯
Thanks again
Rasika
thanks .. that’s great
hi,
is mse 7.4.100.0 accessible thru gui? ive setup a new mse running this verison but i cant access the gui. if it can be accessed thru gui seems like im missing some step.
thanks
Hi Chris,
I believe so. if it does not work I think better to move on to 8.0.110.0 which is latest.
Here is a good reference for that
Click to access CMX.pdf
HTH
Rasika
Great post, very useful. I did not find this in Cisco’s docs 🙂
May I know whether upgrading requires any upgrades on WLC or PRIME side?
My versions are:
> MSE Version = 7.6.100.0
> PRIME Infrastructure Version = 2.0.0.294
> Wireless Controller Version = WS-SVC-WISM2-K9 / 7.4.110.0
Hi,
Just to add to this upgrade guide, I recently did a MSE 7.4 to 8.0.130 upgrade and hit an issue where the MSE kept asking to be rebooted every time you try and issue the “status” or “start” commands.
ERROR OUTPUT:
STATUS: System components were updated during installation. Please reboot the device using the “reboot” command.
To fix this issue, I ran the following commands:
/etc/init.d/msed stop
rm -rf /opt/oracle
rm -rf /opt/data
rm -rf /opt/mse
cd /opt/installers
./CISCO-MSE-L-K9-8-0-130-0-64bit.bin
reboot
/opt/mse/setup/setup.sh – set the Prime to MSE password
Thanks for this input Koevi
I’m confused with login banner in mse.
I change login banner in mse configuration menu wizard(/opt/mse/setup/setup.sh)
then submit
after it success service restart.
Nothing change. I login mse via gui (mseui) and ssh. I can’t see my banner.
PS. My MSE version is 8.0.130.0
Hi, I need some help on the MSE backup. Is there any API available which I can use to execute the Backup from any other NMS. If not, then could you please suggest me the commands used for this. I can try that too.
Thanks
We are planning to upgrade our MSE from v8.0.120.0 to v8.0.140.0. THE MSEs are in HA SSO mode. Do you have an upgrade procedure for this MSE in HA SSO mode?
Thanks.
Hi John,
Did you see this release note ?
https://www.cisco.com/c/en/us/td/docs/wireless/mse/release/notes/mse8_0_140.html#70550
HTH
Rasika
Apologies. I didnt go through that. Thanks.
Do we need to run the setup script /opt/mse/setup/setup.sh on both the active and standby MSE after upgrading from v80.0.120.0 to v8.0.140.0?
Do we need to run the setup script /opt/mse/setup/setup.sh on both the active and standby MSE in HA SSO mode after upgrading from v80.0.120.0 to v8.0.140.0?
Also do we need to restore the backup (taken in Step 2 of the procedure) to the MSE after the upgrade?
Hi John,
I haven’t done MSE-HA upgrade by myself. So best to reach TAC or CSC forum to get further clarifications
HTH
Rasika
I’m in the same boat – upgrading a HA pair from 8.0.130.0 to 8.0.140.x. did you need to run setup on both, and did you need to restore the backup?
Did the upgrade from 8.0.130.0 to 8.0.150.0 with quite a few issues but eventually got the HA primary up & running.
However the secondary has a DB error when doing the upgrade. Probably incorrect password. That I have fixed but no the upgrade won’t run because the DB error is still present.
Anyone any idea on clearing MSE DB errrors?
can i upgrade from 8.0.100.0 to 8.0.150.0 directly? i cant find this info on 8.0.150.0 release note
Great and clear, Thank you very much