
Continuation from my previous post, let’s look at Auto QoS configuration options available in Cisco 9800. With Auto QoS once you select a profile, it will configure Class-Maps, Policy-Maps & apply those policy-maps under policy targets using Service Policy for you. There are 4 different Auto QoS profiles available in 9800
- Fastlane
- Guest
- Voice
- Enterprise
If you remember the 9800 QoS concepts, QoS policies can apply under Port, SSID or Client level. Depend on the different AutoQoS profiles you choose, it will go ahead with pre-defined policy configuration and apply them under policy targets.
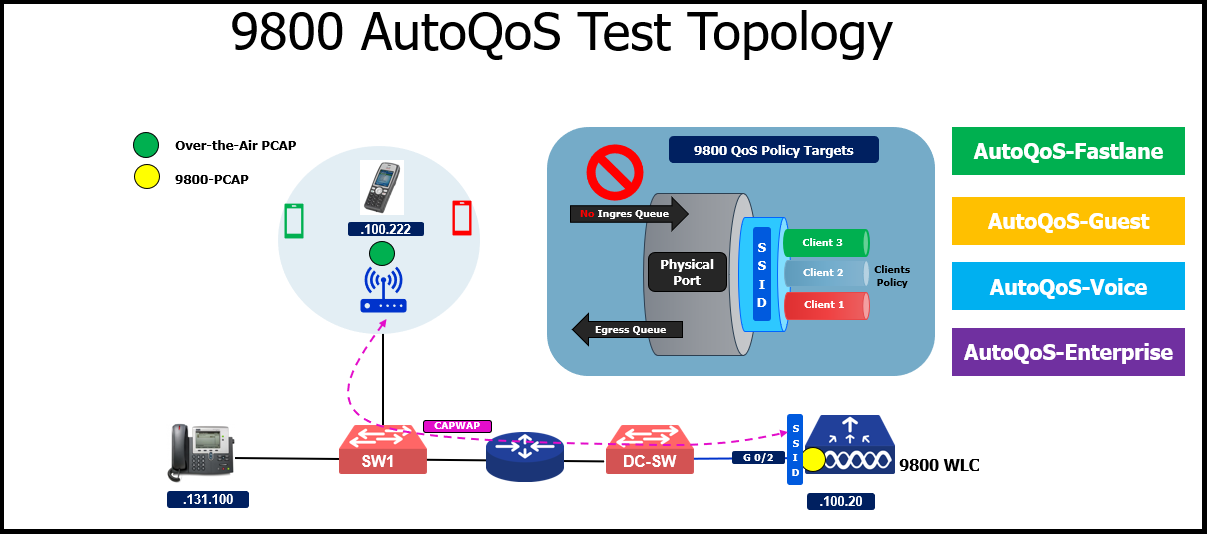
Let’s first look at AutoQoS Fastlane profile. You should not confuse “Fastlane” term here as it is completely different to what you mean by enable “Fastlane” on AireOS WLC. I will do a separate post on how this “Fastlane” term used in different context by Cisco in wireless controllers. In 9800, by enabling “Fastlane” AutoQoS feature, you simply configure a Port Level outbound QoS policy (in fact it is common port level policy for all those 4 AutoQoS profiles)
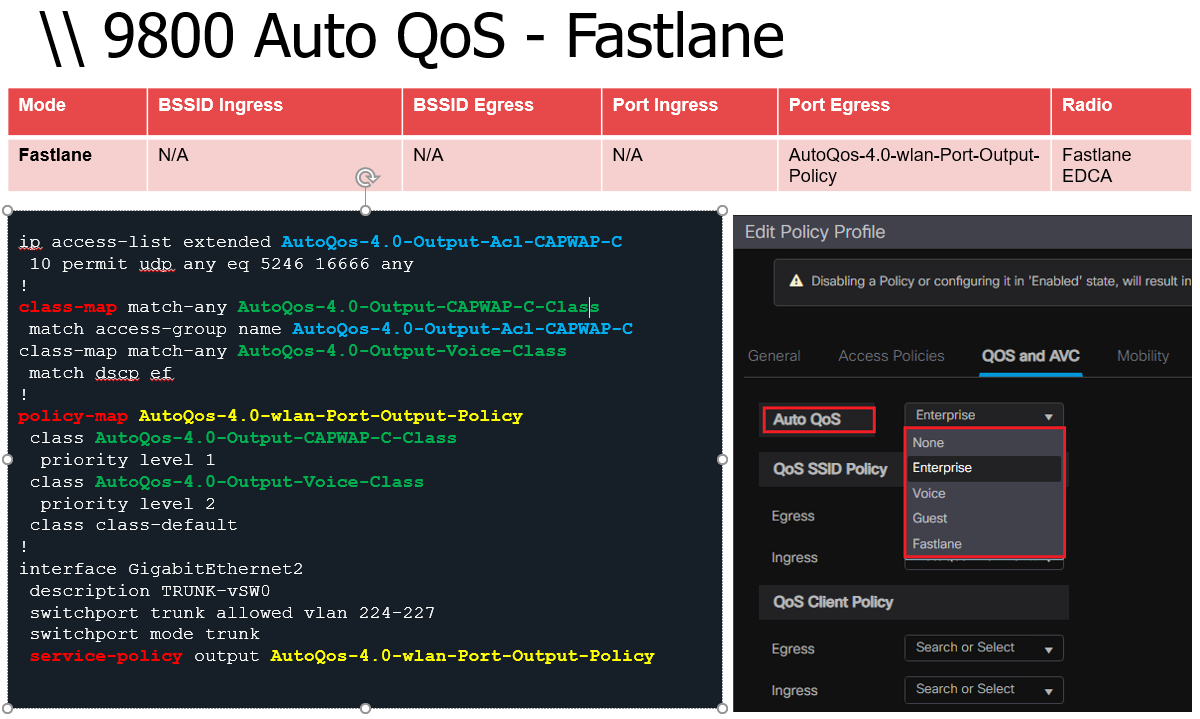
Here is the configurations added as part of that AutoQoS profile configurations. You can use “show archive config differences nvram:startup-config system:running-config” CLI output to get it prior to save your configuration.
With all these AutoQoS profiles, a common port level policy-map “AutoQos-4.0-wlan-Port-Output-Policy” applied to all physical ports of the 9800. In that policy map, CAPWAP control traffic (UDP 5246 & 16666) will put into priority queue 1 where as VoIP data (EF traffic) will put into priority queue 2. Note that 9800 will not support ingress queuing and hence no inbound port level policy define as part of AutoQoS.
Other than the port level policy, it goes ahead and changes EDCA parameters on both radio bands (2.4GHz & 5GHz)
ip access-list extended AutoQos-4.0-Output-Acl-CAPWAP-C
 10 permit udp any eq 5246 16666 any
!
class-map match-any AutoQos-4.0-Output-CAPWAP-C-Class
 match access-group name AutoQos-4.0-Output-Acl-CAPWAP-C
class-map match-any AutoQos-4.0-Output-Voice-Class
 match dscp ef
!
policy-map AutoQos-4.0-wlan-Port-Output-Policy
 class AutoQos-4.0-Output-CAPWAP-C-Class
  priority level 1
 class AutoQos-4.0-Output-Voice-Class
  priority level 2
 class class-default
!
interface GigabitEthernet1
 service-policy output AutoQos-4.0-wlan-Port-Output-Policy
interface GigabitEthernet2
 service-policy output AutoQos-4.0-wlan-Port-Output-Policy
interface GigabitEthernet3
 service-policy output AutoQos-4.0-wlan-Port-Output-Policy
!
wireless profile radio default-radio-profile
 description "Preconfigured default radio profile"
wireless profile policy mrn_policy
 autoqos mode fastlane
!
ap dot11 24ghz edca-parameters fastlane
ap dot11 5ghz edca-parameters fastlane
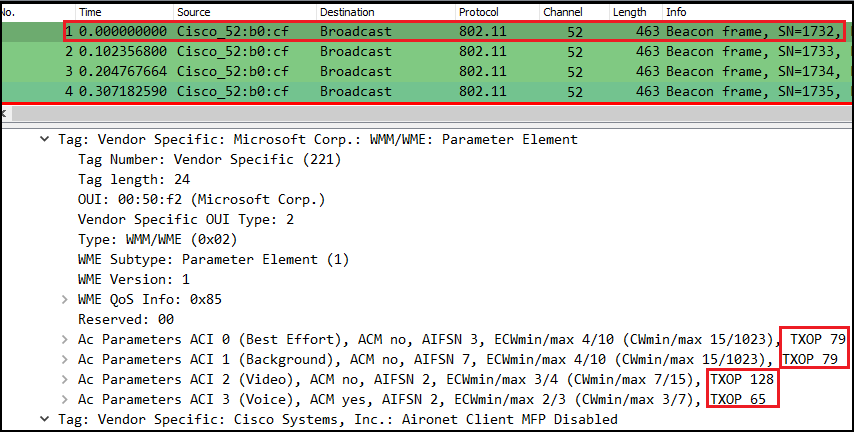
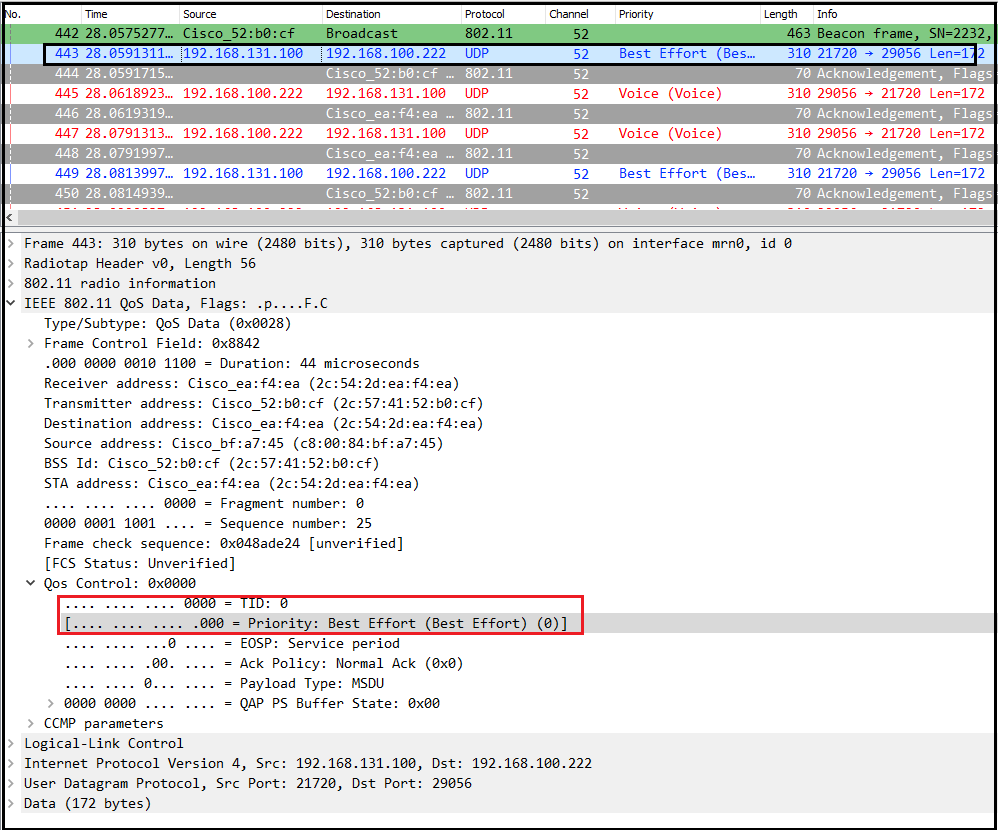
Here is the OTA pcap (AutoQoS-Fastlane-9130-OTA.pcapng – link available end of the post to download it) that shows WMM IE where you can see BE & BK classes also get TXOP value. By default EDCA, you will see TXOP value 0 for BE & BK classes resulting all those WiFi frames with default UP marking has to go through contention every time they transmit one frame (not efficient).
In other AutoQoS profiles (Voice, Guest & Enterprise) that port level policy will be applied. I have exclude those configuration from below, just for simplify (as we discussed above)
Let’s look at Voice AutoQoS profile next. Once you configure it, “Platinum” QoS policy will apply on the SSID level (ingress/egress).

Pls note that common port level policy will be configured as well (but not shown here for the simplicity). Here is the CLI config difference
wireless profile radio default-radio-profile
 description "Preconfigured default radio profile"
wireless profile policy mrn_policy
 autoqos mode voice
 service-policy input platinum-up
 service-policy output platinum
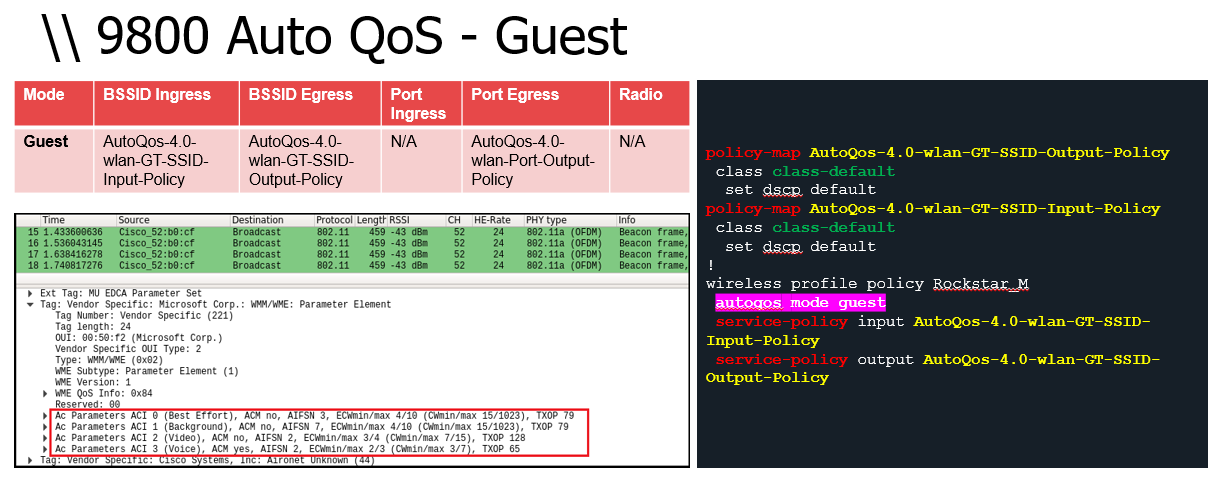
If you configure “Guest” AutoQoS profile, then you will see two policy maps defined (SSID level input & output) and apply them to SSID. However both of those policy maps, only “class-default” class map used and set DSCP value to “Default-DF” or CS0 (ie 000000). This mean all the traffic upstream will be remarked to CS0 at the AP. Even in the downstream direction traffic will remark to CS0.
Here is the CLI configuration differences
policy-map AutoQos-4.0-wlan-GT-SSID-Output-Policy
 class class-default
  set dscp default
policy-map AutoQos-4.0-wlan-GT-SSID-Input-Policy
 class class-default
  set dscp default

wireless profile radio default-radio-profile
 description "Preconfigured default radio profile"
wireless profile policy mrn_policy
 autoqos mode guest
 service-policy input AutoQos-4.0-wlan-GT-SSID-Input-Policy
 service-policy output AutoQos-4.0-wlan-GT-SSID-Output-Policy
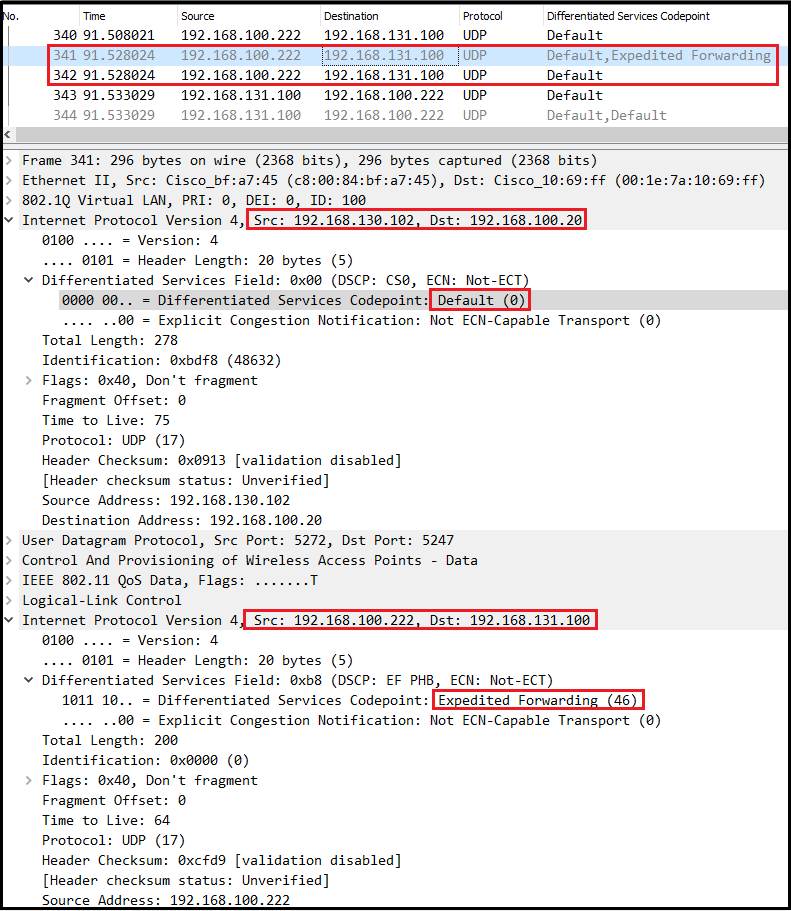
Here is the over the air packet capture in this scenario. As you can see all downstream traffic goes as Best Effort. Note that upstream direction UP value comes as EF till it hits the AP
Here is the packet capture (AutoQoS-Guest-9800.pcap – link available end of the post to download ) on 9800 in that scenario, you can see inner packets DSCP marking is coming as EF till WLC, but outer header DSCP will rewrite to CS0. Even though you expect inner rewrite happen at the AP, until traffic reach WLC that won’t happen today. Hopefully Cisco will fix it in future releases. When traffic reach WLC, it will remove CAPWAP & send the frame to wired side, you will see that time DSCP rewrite to CS0 (frame #342)
Here is the “Enterprise” AutoQoS profile details. Once you apply that profile, it will create two SSID level QoS policies. In the output direction, it will remark EF-Voice & CS6-Network Control traffic as EF. Also any traffic match CS4, CS3 and AF41 will be remarked as AF31. All other traffic will remark as DF/CS0 using “class-default”
Upstream direction (wireless client traffic to AP/WLC), traffic will re-classify based on 6 different class-maps. Here is the summary of QoS policy in that direction.
- Any traffic comes with EF value mark as voice payload traffic.
- Skinny, Cisco-Jabber-Control, SIP & SIP-TLS traffic will mark to CS3.
- Cisco-Phone-Video, Cisco-Jabber-Video, MS-Lynk-Video and Webex-Media will be reclassify as AF41 (34) as Multimedia-Conference traffic.
- Cisco-Jabber-IM, MS-Office-Web-App, Salesforce & SAP application remark as AF21 in “Transactional Data” category.
- FTP, FTP-Data, FTPS-Data & CIFS traffic will mark as AF11 in “Bulk Data” category.
- Netflix, Youtube, Skype & Bittorrent traffic will mark as CS1 in “Scavenger” category.
- Every other traffic will remark as DF/CS0 in “Default” category.

class-map match-any AutoQos-4.0-RT1-Class
 match dscp ef
 match dscp cs6
class-map match-any AutoQos-4.0-RT2-Class
 match dscp cs4
 match dscp cs3
 match dscp af41
!
policy-map AutoQos-4.0-wlan-ET-SSID-Output-Policy
 class AutoQos-4.0-RT1-Class
  set dscp ef
 class AutoQos-4.0-RT2-Class
  set dscp af31
 class class-default
!
class-map match-any AutoQos-4.0-wlan-Voip-Data-Class
 match dscp ef
class-map match-any AutoQos-4.0-wlan-Voip-Signal-Class
 match protocol skinny
 match protocol cisco-jabber-control
 match protocol sip
 match protocol sip-tls
class-map match-any AutoQos-4.0-wlan-Multimedia-Conf-Class
 match protocol cisco-phone-video
 match protocol cisco-jabber-video
 match protocol ms-lync-video
 match protocol webex-media
class-map match-any AutoQos-4.0-wlan-Transaction-Class
 match protocol cisco-jabber-im
 match protocol ms-office-web-apps
 match protocol salesforce
 match protocol sap
class-map match-any AutoQos-4.0-wlan-Bulk-Data-Class
 match protocol ftp
 match protocol ftp-data
 match protocol ftps-data
 match protocol cifs
class-map match-any AutoQos-4.0-wlan-Scavanger-Class
 match protocol netflix
 match protocol youtube
 match protocol skype
 match protocol bittorrent
!
policy-map AutoQos-4.0-wlan-ET-SSID-Input-AVC-Policy
 class AutoQos-4.0-wlan-Voip-Data-Class
  set dscp ef
 class AutoQos-4.0-wlan-Voip-Signal-Class
  set dscp cs3
 class AutoQos-4.0-wlan-Multimedia-Conf-Class
  set dscp af41
 class AutoQos-4.0-wlan-Transaction-Class
  set dscp af21
 class AutoQos-4.0-wlan-Bulk-Data-Class
  set dscp af11
 class AutoQos-4.0-wlan-Scavanger-Class
  set dscp cs1
 class class-default
  set dscp default
!
wireless profile radio default-radio-profile
 description "Preconfigured default radio profile"
wireless profile policy mrn_policy
 autoqos mode enterprise-avc
 service-policy input AutoQos-4.0-wlan-ET-SSID-Input-AVC-Policy
 service-policy output AutoQos-4.0-wlan-ET-SSID-Output-Policy
Now question is which AutoQoS profile you should go with ? Most of you may say, Enterprise AutoQoS as it got bit more granular classification and marking policy. However it all depends on your needs. If you happy with those basic classification & marking then no issue of going ahead with that profile. Sometime in your enterprise, you many not want to treat “YouTube” traffic same as “Bittorrent” in scavenger category. You may want to mark Zoom traffic as “Multimedia Conferencing”. Therefore having your own QoS policy is my recommendation.
Cisco recommendation is to set it “Fastlane” AutoQoS under Policy Profile. With that profile, EDCA parameters will change in both band. That will give TXOP for BE & BK traffic as well. Also it will set client level QoS policy to platinum. You can read 9800 Best Practice Guide for more details. Note that Fastlane profile got no SSID level policy, so your traffic will go with original DSCP marking without any modification at WLC/AP level.
That brings us to 9800 Custom QoS which we are going to discuss in next post. Stay tuned.
Here is the link to all pcap taken during these 4 profiles testing.
RELATED POSTS
1. QoS for WLAN Professionals
2. RFC8325 – QoS Mappings
3. AireOS QoS Recommendations
4. 9800 QoS Overview
5. 9800 QoS Webinar
6. 9800 Custom QoS

Hello! 🙂
A great post, thank you for sharing such an amazing technical topic is such a way!
Great article again!
I’m just wondering why Cisco always recommends Fastlane?
We trust the end user to tag the traffic, then we force the AP to trust dscp, and Fastlane makes this traffic goes through Queue 2 up to the network.
Is it faster or more efficient?
Rasika, any plans for a follow-up on this, and specifically on custom QOS that is specific to the University/Higher Education market? As you mention in your article, the enterprise AutoQOS isn’t optimal for a university setting, and certainly if there is residential housing, where relegating Youtube, Netflix, and other services to scavenger isn’t ideal.